


It actually started with a job on the Ural. Not that it was broken or anything. I had hurt my ankle, couldn't kickstart and then decided to mount a side valve block that I still had.
And then the tank has to be removed
The tank sides are connected by a tube that runs under the top frame tube. So when removing the tank you are always messing with gasoline. A tank with two fuel taps would be nice.
At Richard Busweiler's winter sales I had bought some things and as a purchase bonus I received two Dnepr tanks. Ural tanks are scarce. Dnepr tanks don't. The tanks had an emphatic patina and the red one became the donor for the blue one. The fuel cock of the red one was ground. In the blue one I made a hole with the tapered drill where the threaded bush of the fuel tap on the inside fell. Then the prosthesis only had to be mounted.
Be careful with welding!
A friend warned against welding on gas tanks. It had once yielded him an almost perfectly spherical specimen because any remaining gasoline vapor exploded. But he had learned from his mistakes and was eager to help me. Whoever offered that to me was fellow villager Theo Terwel. That saved a lot of travel time. The tank was old, dry and rusty on the inside. Theo took a sniff and welded the new connection in no time.
Rust in the tank
Then I had exactly what I wanted with a lot of rust in the tank as an unwanted extra. At Startwin they have a special turn and tilt construction. Then grit goes into the tank and the tank can rotate 3D for a while. The result is a clean tank. Tying it to a concrete mixer with a few hands of nuts and bolts also works. In addition, there are chemical rust converters. But when I read the label text, I didn't want to harm the environment.
But it can also be much easier
With a handle in the kitchen cupboard. There is baking soda. That is a leavening agent for bread. And who doesn't make their own bread these days? So the kitchen cupboard. And then?
Then the battery charger is taken from the shelf and we get started. With electrolytic de-rusting of the tank. And what do we need, besides that rusty tank?
- A direct current source (DC) (battery, battery charger)
- A piece of cable
- Water
- Soda (ordinary baking soda, NaHCO3)
- A shelf
- A piece of metal
- 400 gram citroensour (drug store or Turkish supermarket)
- E95 / E10 resistant coating or two-stroke oil
How do you do it?
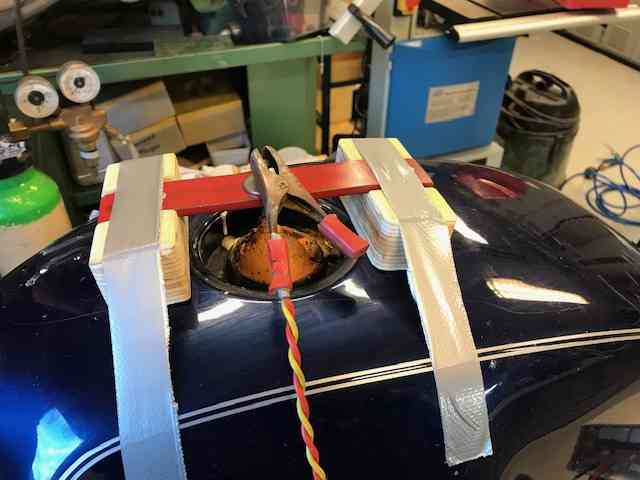
Connect the cable to the plus (red) and minus (black) of the DC charger or battery. Take a shelf and a piece of iron that you no longer need. Make a hole in the board and attach the piece of iron so that it is fixed. Dissolve 100 grams of soda in warm water. Fill the tank to the brim with the baking soda solution and plain water. Place the tank on some wooden blocks, or on another non-conductive surface (wooden table, an upside-down wooden box or something). Put the piece of iron in the tank. Make sure the piece of iron is as deep in the tank as possible, but it should not touch the tank anywhere. Otherwise there will be a short circuit!
Make sure to secure everything properly
If everything is in place, tape everything tightly so that you cannot accidentally move the piece of iron or plank during the electrolysis so that you still get a short circuit. Make sure the shelf 'floats' above the tank, so that rubbish or water can come out during the electrolysis. Connect the cable that you connected to the charger to the positive pole to the piece of iron in the shelf. You must have a bare piece of the tank (not painted). With motorcycles, the fuel tap is great for this.
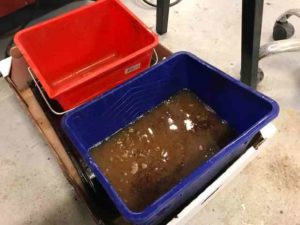
You can now turn on the charger. You can choose how many volts (use at least 12 V). The higher the current (Ampere), the faster the case works. Results should already be visible after an hour, but for complete conversion of the rust, only assume XNUMX hours or more. When you think you are ready, let the water run. The rust has all gone to the piece of iron or turned into a black precipitate.
The second stage
Now fill the tank completely with water again, and add 15 grams (for a tank of approx. 400 liters) citroenacid. You can also use cleaning vinegar. For example, fill 3/4 with white vinegar and 1/4 with water. Leave this for at least 24 hours. After rinsing thoroughly, the job is done. Note, your tank will immediately start to rust again. After rinsing, you should therefore immediately apply a coating or throw half a liter of two-stroke oil in your tank, so that the metal is protected.
Friend Gerhard has done it with his BMW tank. So it must be good enough for a Dnepr tank.
You do of course tinker at your own risk and you cannot hold us liable for things that could go wrong.


I can recommend Van Houten Motoren in Marum (06-53145730). This BMW classic specialist can do (almost) everything and also has a special turn and tilt construction that makes the tank completely clean. They also provide the coating so that the tank can be used safely and fully again!
Following this article tried with a rusted Solex tank, it works!
I also did this with tank v a car Datsun 260 z. Result .. went to the bone so that there were even holes where it was penetrated by rust at the top. Then plug the holes with metal kneadmastik. And put in coating product…. And let it run completely as well as possible so that the whole tank was coated. After a few months, the coating has dissolved on certain parts… solution. : have the tank renovated at Wijnant in Oudenaarde for less than 300 euros. For your information.. .
Interesting process.
That makes my tricks box a bit fuller again 👍🏼👍🏼
“Connect the cable that you connected to the charger to the positive pole to the piece of iron in the shelf. You must have a bare piece of the tank (not painted). The fuel tap is great for motorcycles ”. Could it be that the last two sentences are about the MINUS cable and the first two about the PLUS cable? Otherwise it will be a very unclear story!
⚡⚡⚡
A few years ago I also did this with a rusted tank, within half an hour the rust water was already bubbling, indeed let it simmer for 24 hours and then citroenacid, and you have bare steel.
Do cover the tank as it “boils over” a bit, you can't really go wrong.
I still have an old Sherman tank full of rust somewhere. Does it work with that too?
Of course that's possible. Only the other way around, the liquid not in the tank but the tank in the liquid. Do you need a bigger container!
tank that is rusted on the inside can be cleaned simply and cheaply by filling it up for a week with cheap cleaning vinegar
Ad Bot (near Schoonhoven) did this for me in the past at a moped tank, rotating with gravel
Then a 2 component coating from Tank Cure.
Great result.
Unfortunately, Ad Bot no longer does this, no idea that his son has taken over this
It seems like an exciting activity to me.
I myself am left with an MZ tank full of rust that has been running on a cement mixer for about a week but has not improved.
I'm going to run errands and try this.